PowerShell – Importing AD users from CSV

What are the situations you’ll need lots of Dummy AD data? When you want to run some awesomely crafted PowerShell AD scripts, that’s where.

I was in a situation a few months ago where I needed replicate a VERY large set of AD data in order to pull some queries with Get-Aduser and Set-Aduser. I toyed with the idea of just creating them manually, or restoring them from production (this is a bad idea, don’t restore from production for a testing environment!). So I found a script that would import a great deal of AD data, and I also found a place online that can create a buttload of fake AD data for me.

The Setup:

  • A Running AD Domain controller
  • Powershell ISE
  • https://mockaroo.com CSV loaded with all sorts of dummy AD data

First, let’s hit mockaroo.com.

For this entry, I’m going to fill as many fields as possible that relate to a powershell script. For each field in powershell, we’ll create a matching one in Mockaroo, and we’ll name it consistently.

This is the set of data with parameters I’m using:

The fields I’m using in AD are (copied from above)

  • City
  • Company
  • Description
  • Department
  • Email
  • EmployeeID
  • GivenName
  • MobilePhone
  • Office
  • OfficePhone
  • Password
  • Path
  • Postalcode
  • State
  • Streetaddress
  • Surname
  • Title

I also need to place these created accounts into a specific OU. I had to do some editing in Excel, and placed the OU ADSI path into that Path attribute above.

Here’s my example with column and headers:

CityCompanyDepartmentEmailEmployeeIDGivenNameMobilePhoneOfficeOfficePhonePasswordPathPostalcodeStateStreetAddressSurNameTitle
IpabaSkybleHuman Resourcescyouthead0@google.es873-02-1259Codie+55 283 153 2678 592-719-1607MhyWOJIAE“OU=Contoso-Users,DC=Contoso,DC=com”35198-000 787 Arizona TrailYoutheadStructural Analysis Engineer

Generate the data you need, or create the information you require and save it into a CSV file (ideally in a Windows format).

Now, the powershell code:

01	# Import active directory module for running AD cmdlets
02	Import-Module activedirectory
03	 
04	#Store the data from ADUsers.csv in the $ADUsers variable
05	$ADUsers = Import-csv "C:\Users\Administrator\Desktop\2AD_users.csv"
06	 
07	#Loop through each row containing user details in the CSV file 
08	foreach ($User in $ADUsers)
09	{
10	#Read user data from each field in each row and assign the data to a variable as below
11	$City           =$User.City
12	$Company        =$User.Company
13	$Description    =$User.Description
14	$Department     =$User.Department
15	$Email          =$User.Email
16	$Employeeid     =$User.Employeeid
17	$GivenName      =$User.GivenName
18	$MobilePhone    =$User.MobilePhone
19	$Office         =$User.Office
20	$OfficePhone    =$User.OfficePhone
21	$Password       =$User.Password
22	$Path           =$User.Path
23	$Postalcode     =$User.Postalcode
24	$State          =$User.State
25	$Streetaddress  =$User.Streetaddress
26	$SurName        =$User.SurName
27	$Title          =$User.Title
28	$Username       =$GivenName+"."+$Surname
29	 
30	    #Check to see if the user already exists in AD
31	if (Get-ADUser -F {SamAccountName -eq $Username})
32	    {    #If user does exist, give a warning
33	         Write-Warning "A user account with username $Username already exist in AD."
34	    }
35	    else
36	    {
37	        #User does not exist then proceed to create the new user account
38	        #Account will be created in the OU provided by the $Path variable read from the CSV file
39	        New-ADUser `
40	            -City $City `
41	            -Company $Company `
42	            -Description $Description `
43	            -Department $Department `
44	            -Email $Email `
45	            -EmployeeID $EmployeeID `
46	            -GivenName $GivenName `
47	            -MobilePhone $MobilePhone `
48	            -Office $Office `
49	            -OfficePhone $OfficePhone `
50	            -AccountPassword (convertto-securestring $Password -AsPlainText -Force) `
51	            -Path $Path `
52	            -Postalcode $Postalcode `
53	            -State $State `
54	            -Streetaddress $Streetaddress `
55	            -SurName $SurName `
56	            -Title $Title `
57	            -SamAccountName $Username `
58	            -UserPrincipalName "$Username@dtab.org" `
59	            -Name "$GivenName $SurName" `
60	            -DisplayName "$GivenName $SurName" `
61	            -Enabled $true
62	    }
63	}

I had to reference the New-ADUser powershell commandlet. A great deal of the switches came from this article. As you can see, I’ve also alphabetized the fields to make sorting a little easier.Notes about this script:

Code Syntax explanation – lines 11 – 28

01	$City           =$User.City
02	$Company        =$User.Company
03	$Description    =$User.Description
04	$Department     =$User.Department
05	$Email          =$User.Email
06	$Employeeid     =$User.Employeeid
07	$GivenName      =$User.GivenName
08	$MobilePhone    =$User.MobilePhone
09	$Office         =$User.Office
10	$OfficePhone    =$User.OfficePhone
11	$Password       =$User.Password
12	$Path           =$User.Path
13	$Postalcode     =$User.Postalcode
14	$State          =$User.State
15	$Streetaddress  =$User.Streetaddress
16	$SurName        =$User.SurName
17	$Title          =$User.Title
18	$Username       =$GivenName+"."+$Surname

This code stores the CSV columns (headers) information for each user into $variables. I’ve kept the variable names the same as the CSV headers tokeep things simple. The last line, $username stores the firstname (period) lastname. Everyone will likely have a different standard for usernames, I just like this format since I don’t have to re-write code.

Code Syntax explanation – lines 31-33

1	if (Get-ADUser -F {SamAccountName -eq $Username})
2	    {    #If user does exist, give a warning
3	         Write-Warning "A user account with username $Username already exist in AD."

Some error checking code. Checking for duplicate information in the imported CSV file.

The variables used in this script are considered ‘more than necessary’. The bare basic amount needed (I think) are username, password, first and last name. Anything you add or take away, requires some editing of the code, and the CSV file.

Notes about this Script:

  • For some reason the New-ADUser command does not allow the -country variable, it seems to fail each time. This is not a deal breaker for me, but for you it might be something worth investigating.
  • When importing passwords, use 10 characters at a minimum. Mockaroo only shows a password “between 6 to 12 chars”. By trial and error, I found manytools.org where I could generate the passwords necessary in the format I wanted, and copy/pasted them into my user CSV.
  • Should you feel hesitant about running this script, add “-Whatif” on the end of the Add-ADUser cmdlet line

Creating your first Powershell GUI – Part 3

Getting caught up?

  • Part 1 – Creating a simple GUI
  • Part 2 – Adding variables, added functionality
  • Part 3 – (that’s where we are)

In this post, I’ll be adding some error checking in the form of a function. In a late article, I may revisit this and re-write some of these functions to clean up the code.

For now, we’ll focus on the following:

The Form should look something similar based on the code provided in Part 2

In Part 2, we used

  • Textbox1
  • Button1
  • Datagridview1

I’ll be covering element 3 (Button2) – “Search output to out-gridview” in this post. I’ll also be doing some error-checking in the event that there are no results to display.

In Part 2, we used this piece of code to output the results of the query into the datagridview:

Function ADSearch {
$wc = ‘*’ 
$Namesearch = $wc + $textbox2.text + $wc 
$results= get-Aduser -Filter {name -like $Namesearch} -Server $Server -Credential $Credential 
$DataGridView1.DataSource = [System.Collections.ArrayList]([System.Object[]](,$results | Sort-Object SamAccountName, Name))
}

Now, we’re going to configure that button to use the powershell utility out-gridview. If you’re not familiar with this command, it’s super handy for many reasons.

Below is the code, with the highlighted portions that pertain to the functionality of Button2, and  function ADSearch2.

$results = $null #reset the $results variable each run 
$server = "10.0.0.101"
$Credential = "dtab\administrator"

Add-Type -AssemblyName System.Windows.Forms
[System.Windows.Forms.Application]::EnableVisualStyles()

$Form                            = New-Object system.Windows.Forms.Form
$Form.ClientSize                 = New-Object System.Drawing.Point(400,389)
$Form.text                       = "Form"
$Form.TopMost                    = $false

$Button1                         = New-Object system.Windows.Forms.Button
$Button1.text                    = "Search for User"
$Button1.width                   = 124
$Button1.height                  = 30
$Button1.location                = New-Object System.Drawing.Point(41,52)
$Button1.Font                    = New-Object System.Drawing.Font('Microsoft Sans Serif',10)
<#-----Calls a function 'ADSearch'-------#>
$Button1.Add_MouseClick({ADSearch($Textbox2.text)}) 

$TextBox2                        = New-Object system.Windows.Forms.TextBox
$TextBox2.multiline              = $false
$TextBox2.text                   = "Enter User to search here"
$TextBox2.width                  = 247
$TextBox2.height                 = 20
$TextBox2.location               = New-Object System.Drawing.Point(91,23)
$TextBox2.Font                   = New-Object System.Drawing.Font('Microsoft Sans Serif',10)

$DataGridView1                   = New-Object system.Windows.Forms.DataGridView
$DataGridView1.width             = 376
$DataGridView1.height            = 282
$DataGridView1.location          = New-Object System.Drawing.Point(12,94)

$Button2                         = New-Object system.Windows.Forms.Button
$Button2.text                    = "Search output to out-gridview"
$Button2.width                   = 206
$Button2.height                  = 30
$Button2.location                = New-Object System.Drawing.Point(182,52)
$Button2.Font                    = New-Object System.Drawing.Font('Microsoft Sans Serif',10)
$Button2.Add_MouseClick({ADSearch2($Textbox2.text)}) 

$Form.controls.AddRange(@(
        $TextBox2
        $Button1,
        $Button2,
        $DataGridView1
        ))

[system.windows.forms.application]::run($form) #Runs form with runtimes - this is a trial and error thing

Function ADSearch {
        <#------function 'ADSearch' runs Get-ADUser query, stores into $results variable------#>
        $wc = '*' #Wildcard character to assist with the text search
        $Namesearch = $wc + $textbox2.text + $wc #appends the wildcard characters to the search, infront and behind, stores into the $NameSearch Variable
        $results= get-Aduser -Filter {name -like $Namesearch} -Server $Server -Credential $Credential #This is the Query itself

        $number = $results.count #Count the number of results found
        display_results($results) #call function with results found
}

Function ADSearch2{
        $wc = '*' #Wildcard character to assist with the text search
        $Namesearch = $wc + $textbox2.text + $wc #appends the wildcard characters to the search, infront and behind, stores into the $NameSearch Variable
        $results= get-Aduser -Filter {name -like $Namesearch} -Server $Server -Credential $Credential #This is the Query itself

        $number = $results.count #Count the number of results found
        display_results2($results) #call function with results found
}

function display_results{
        if ($results -ne $null){
            #if results found, display in out-grid
            $DataGridView1.DataSource = [System.Collections.ArrayList]([System.Object[]](,$results | Sort-Object SamAccountName, Name))
        }
        else{
            #if no results found, display error message
            [System.Windows.MessageBox]::Show('No results found')
        }
}

function display_results2{
        if ($results -ne $null){
            #if results found, display in out-grid
            $results | out-gridview
        }
        else{
            #if no results found, display error message
            [System.Windows.MessageBox]::Show('No results found')
        }
}

Line 41, this calls the ADSearch2 function, with the input from textbox2.

$Button2.Add_MouseClick({ADSearch2($Textbox2.text)})

Lines 62 – 69, this is the ADSearch2 function. Notice though, how it only captures it into the $result variable. We also count the number of results found and store that into $Number. This is where error-checking comes in.

Function ADSearch2{
        $wc = '*' #Wildcard character to assist with the text search
        $Namesearch = $wc + $textbox2.text + $wc #appends the wildcard characters to the search, infront and behind, stores into the $NameSearch Variable
        $results= get-Aduser -Filter {name -like $Namesearch} -Server $Server -Credential $Credential #This is the Query itself
 
        $number = $results.count #Count the number of results found
        display_results2($results) #call function with results found
}

Lines 82 – 90, is the function that checks the amount of results and either shows the results, or displays ‘No results found’ in a popup box. That ‘if’ statement below looks at the number of results. If it’s Zero, it’s a Null Value. If it’s a Null Value, it goes into the ‘Else’ portion.

function display_results2{
        if ($results -ne $null){
            #if results found, display in out-grid
            $results | out-gridview
        }
        else{
            #if no results found, display error message
            [System.Windows.MessageBox]::Show('No results found')
        }
}

This line does the output into that out-gridview I mentioned earlier.

    $results | out-gridview

The out-gridview displays into it’s own separate window. Now, the beauty of this window is that it can be resized, filtered, copied and sorted.

Now, this code is not complete by any means. But it’s working and suits our needs for now. Ideally, the functions can be rewritten with more efficient code, perhaps a case statement. But for now, we have a working GUI that can do a simple search of users within an AD environment, output to an embedded Grid, or output to an external powershell utility in gridviewer. If there’s any improvements, I’m certainly open to doing more, or seeing what the I.T Blogging community has in store.

[ivory-search 404 "The search form 3350 does not exist"]

Creating your first Powershell GUI – Part 2

Already seen this part? Check out Part 1, Part 2, and Part3

In part 1, we covered the very basics. A one-line Get-ADUser query, a simple form with one button and output textbox.

In this entry, we’ll add more functionality that:

  • Captures input from the GUI
  • Outputs specific information
  • Makes use of variables

If you remember, we started off with this form:

Form 
Search up "Rick" 
Results show up here

Simple winform with a button, a textbox, and a function.

Now, we’re going to take input from a user, and display the output to a datagridview instead of a textbox. A textbox is usually fine for output, but with a Get-ADUser query, there are multiple fields we usually want to look at. Text boxes don’t do text wrapping very well, and the output is kind of messy. Also in using a grid, it neatly sorts everything based on some criteria we create.

Here’s a sample of what the box looks like afterwards in PoshGUI:

ο υ1ρυ1 to

I’ve labelled each major component, and listing the names in the Powershell code for easier reference:

  1. Textbox1 = This is the input from the end user. Or more accurately, we’ll be capturing the ‘text’, in the form of $textbox1.text into a variable, and using that in our Get-ADUser search parameter.
  2. Button1 = This executes the search query with the captured text from textbox1. The output from this will go into the 4th component: the datagridview.
  3. Button2 = This will execute the exact same search, but outputs it to an external gridviewer. I’ll go through some of the pro’s and con’s of this method later.
  4. Datagridview1 = output of Get-Aduser shows up here.

As I stated earlier, a textbox is usually fine for some simple output. A datagridview is handy since it puts all the results into columns that are resizable, sortable and we can copy directly from it. I listed two different ways to use grid form with Button 2 and the Datagridview1. I’ll cover more about what each does soon.

Below is the completed source code that:

  • Makes use of the “search for User” button (AKA, ‘$button1’)
  • Takes input from the textbox (AKA, ‘$Textbox2.text’)
  • Uses a function ‘ADSearch’ which we defined the parameters
  • Ouputs the result to a gridview embedded into the form.

I’ll go into more detail about the Gridviewer output, the variables, then we’ll create some code for error checking.

$results = $null #reset the $results variable each run
$server = “10.0.0.101”
$Credential = “contoso.com\administrator”

Add-Type -AssemblyName System.Windows.Forms
[System.Windows.Forms.Application]::EnableVisualStyles()

$Form = New-Object system.Windows.Forms.Form
$Form.ClientSize = New-Object System.Drawing.Point(400,389)
$Form.text = “Form”
$Form.TopMost = $false

$Button1 = New-Object system.Windows.Forms.Button
$Button1.text = “Search for User”
$Button1.width = 124
$Button1.height = 30
$Button1.location = New-Object System.Drawing.Point(41,52)
$Button1.Font = New-Object System.Drawing.Font(‘Microsoft Sans Serif’,10)
<#—–Calls a function ‘ADSearch’——-#>
$Button1.Add_MouseClick({ADSearch($Textbox2.text)})

$TextBox2 = New-Object system.Windows.Forms.TextBox
$TextBox2.multiline = $false
$TextBox2.text = “Enter User to search here”
$TextBox2.width = 247
$TextBox2.height = 20
$TextBox2.location = New-Object System.Drawing.Point(91,23)
$TextBox2.Font = New-Object System.Drawing.Font(‘Microsoft Sans Serif’,10)

$DataGridView1 = New-Object system.Windows.Forms.DataGridView
$DataGridView1.width = 376
$DataGridView1.height = 282
$DataGridView1.location = New-Object System.Drawing.Point(12,94)

$Button2 = New-Object system.Windows.Forms.Button
$Button2.text = “Search output to out-gridview”
$Button2.width = 206
$Button2.height = 30
$Button2.location = New-Object System.Drawing.Point(182,52)
$Button2.Font = New-Object System.Drawing.Font(‘Microsoft Sans Serif’,10)

$Form.controls.AddRange(@(
			$TextBox2
			$Button1,
			$Button2,
			$DataGridView1
))

[system.windows.forms.application]::run($form) #Runs form with runtimes – this is a trial and error thing

Function ADSearch {
<#——function ‘ADSearch’ runs Get-ADUser query, stores into $results variable——#>
$wc = ‘*’ #Wildcard character to assist with the text search
$Namesearch = $wc + $textbox2.text + $wc #appends the wildcard characters to the search, infront and behind, stores into the $NameSearch Variable
$results= get-Aduser -Filter {name -like $Namesearch} -Server $Server -Credential $Credential #This is the Query itself
<#—–Display output to the embedded DataGridView——-#>
$DataGridView1.DataSource = [System.Collections.ArrayList]([System.Object[]](,$results | Sort-Object SamAccountName, Name))
}

Let’s look at the variables:

$results = $null #reset the $results variable each run
$server = "10.0.0.101"
$Credential = "contoso.com\administrator"

This will come in handy later when we call the Get-ADUser query. By passing variables, it becomes a little easier to change the script to fit our needs. Especially if you’re dealing with credentials or domains.

Now let’s look at the datagridview:

$DataGridView1.DataSource = [System.Collections.ArrayList]([System.Object[]](,$results | Sort-Object SamAccountName, Name))

Breaking down each component:

$DataGridView1.DataSource

This is the datagriviewd itself. By default it’s already in a neatly arranged set of columns and rows. Makes sense when we use it for a large amount of data with multiple fields. Makes for easier parsing if we’re looking for something.

[System.Collections.ArrayList]([System.Object[]]

Since the Datagrid arranges the data, we need to store the information into an array. If we didn’t, it would all be string information. Some data does not translate into string information nicely (such as ‘account enabled’, which would just translate to a 1 or a 0).

(,$results

An array by default starts with a ‘0’ (zero) value. To display the results of the AD search, we stored it into the $results variable. By putting the comma in front “,” this tells the array to display all the contents from the beginning of the array.

| Sort-Object SamAccountName, Name))

The Pipe and Sort-Object commands sort the values accordingly by SamAccountName, then by Name. These values were imported by the original get-aduser command. You could actually list this by any value that get-Aduser is able to pull, such as ‘displayname’, ’email’, etc…

Read up on Part3 of this tutorial, where I’ll be adding an error checking ability, as well as using the other button for a different style of output.

[ivory-search 404 "The search form 3350 does not exist"]

Creating your first Powershell GUI – Part 1

Already seen this part? Check out Part 1, Part 2, and Part3

Powershell, while a powerful tool can sometimes lack that person touch that a GUI interface offers. Console output is fine and dandy, but there are times when parsing through a large amount of data can be done with a GUI and some simple commands.

From here, I’m going to assume you know the basics. Such as awareness of the get-executionpolicy and set-executionpolicy commands, and a little knowledge of PowerShell ISE.

The Setup

I’m doing this with my home lab from a non-domain computer. Which means I’ll be using some credential switches you may not need.

For this example, we’ll take something simple, like

Get-ADUser

Get-ADUser gets a user object or searches to get multiple user objects from Active Directory. To keep this simple, we’ll have it search up a name. You’ll get the idea of what I’m doing and how we can keep it somewhat simple.

First, we’ll get a simple query working. Let’s search for a user named ‘Rick’

get-Aduser -Filter {name -like '*rick*' } -Server 10.0.0.101 -Credential "contoso.com\administrator"

Explanation of the above query:

-Filter {name -like '*rick*'}

Search for a username using wildcards in-front and behind of name we’re looking for.

-Server 10.0.0.101

Look at a specific Domain controller. Since this is on a different subnet for me, I’m specifying it by IP. You can simply use the hostname of the domain controller, or you can use “-SearchBase” and plug in the domain name itself.

-Credential "contoso.com\Administrator" 

Provide a specific set of credentials with read access to the domain. Since I’m issuing these commands from an non-domain machine, this is handy for me in the testing phase.

Put this or something very close to this into PowerShell ISE. Highlight the code and hit F8 to run the selection. This just ensures you have something to search for. Obviously, I chose ‘Rick’ because that name exists in my Domain, you’ll have to pick or create one to search.

So now we have the format of the query, how can we turn it into a GUI?

Visit POSHGUI.com. This is a free website that creates the Powershell forms for you. All you need to do is create the code to plunk in. Goto WinForms Designer.

Now on the form drag a button and a text box. For this example, we’ll want the text box a little bigger – which means in the ‘behavior’ section, we need multi-line. You should have something similar to the below:

ön

I kept the default values for each. They should be button1 and textbox1 respectively from here on.

What we want to happen: When pressing ‘Search Up “Rick”‘ button, the results should show in the text box below.

In PoshGUI click on the ‘Code’ button. This creates the entire form with coordinates, arguments and ranges.

1 • This form was created using POSÆU1.co• 
. NAME 
unti t led 
Add-Type -AssemblyNsme System Windous.Forns 
a free online gui designer for Power-shell 
[System. Windows . Forms . Application] : : EnableVisuaIStyIes() 
SForn. Clientsize 
SFcrn. text 
11 
SFcrn. Topmost 
12 
S Buttonl 
14 
ss uttcnl. text 
IS 
SS uttcnl.nidth 
IS 
SSuttcn1. height 
17 
SButtcn1. location 
IS 
SButtcn1. Font 
19 
STexteox1 
21 
SText20x1. multi line 
22 
STexteox1. text 
23 
STexteox1. nidth 
24 
SText20x1. height 
STexteox1. location 
STexteox1. Font 
27 
29 
Object 
Yeu Object 
- "Form" 
Sfalse 
Object 
"Search up 
Object 
Object 
Object 
St rue 
system .Windous . Forms . Form 
system. Windows . Forms . Button 
'"Rick' 
System. Drawing. Point(é2, 14) 
System.orauing. Font( •microsoft Sans Serif' , le) 
system. Windows . Forms . TextBox 
"Results show up here" 
Object System.orawing. 
Object System.orauing. Font( •microsoft Sans Serif' , le) 
ST extBox1

The above is a screenshot, I’ve added my code below with some additional explanation in between the comments.

$results = $null #reset the $results variable each run

Add-Type -AssemblyName System.Windows.Forms

[System.Windows.Forms.Application]::EnableVisualStyles()
$Form = New-Object system.Windows.Forms.Form
$Form.ClientSize = New-Object System.Drawing.Point(400,324)
$Form.text = “Form”
$Form.TopMost = $false

$Button1 = New-Object system.Windows.Forms.Button
$Button1.text = “Search up `”Rick`””
$Button1.width = 253
$Button1.height = 30
$Button1.location = New-Object System.Drawing.Point(62,14)
$Button1.Font = New-Object System.Drawing.Font(‘Microsoft Sans Serif’,10)
<#—–Calls a function ‘ADSearch’——-#>
$Button1.Add_MouseClick({ADSearch})

$TextBox1 = New-Object system.Windows.Forms.TextBox
$TextBox1.multiline = $true
$TextBox1.text = “Results show up here”
$TextBox1.width = 338
$TextBox1.height = 261
$TextBox1.location = New-Object System.Drawing.Point(26,57)
$TextBox1.Font = New-Object System.Drawing.Font(‘Microsoft Sans Serif’,10)

$Form.controls.AddRange(@($Button1,$TextBox1))

[system.windows.forms.application]::run($form) #Runs form with runtimes – this is a trial and error thing

Function ADSearch {
<#——function ‘ADSearch’ runs Get-ADUser query, stores into $results variable——#>

$results= get-Aduser -Filter {name -like ‘*rick*’ } -Server 10.0.0.101 -Credential “contoso.com\administrator”

<#—–Display output to $Textbox1.text——-#>
$TextBox1.text = $results

}

Copy and paste that code, edit the query to whatever name exists in your Domain, and the IP to match whatever domain IP you have. Hit F5 to run the script, and you should see something similar.

Form 
Search up "Rick" 
Results show up here

Click the Mouse Button, enter your domain credentials and the results display:

Form 
Search up "Rick" 
CN=Rick

And that’s about it! It’s a simple script, and shows some of the very simple ways to display information in a GUI. This only needs PowerShell ISE, PoshGUI, and some curiosity.

If you want to make this a little fancier, take input from a user, and display specific information, join me for Part 2.

[ivory-search 404 "The search form 3350 does not exist"]

Ubuntu – Add Google 2FA for SSH

The Setup

Host: Ubuntu 18.04 “Bionic Beaver” release
Software: Google Chrome

Original article found on linuxbabe

Super handy, and secure way to ssh into your Linux Box at home. This uses the Android Google Authenticator for the QR code, generated right in the SSH window. And you get the added bonus of 6 one-time use codes to use.

To start, SSH into your Unbuntu computer as root.

$ sudo apt install libpam-google-authenticator

Then run the google-authenticator command to create a new secret key in your home directory.

$ google-authenticator

When asked:

Do you want Authentications to be time-based (y/n)

Answer Y!

The QR code should display in the SSH window, ideally you want to scan this into your Google Authenticator. Other sources point out that FreeOTP (developed by RedHat can serve the same purpose)

.

once scanned into your mobile Google Authenticator, you it should show as a new entry.

Configure SSH daemon to use google authenticator

$ sudo nano /etc/ssh/sshd_config

Add in:

UsePAM yes
ChallengeResponseAuthentication yes

Save file

$ sudo systemctl restart ssh
$ sudo nano /etc/pam.d/sshd

Add the lines

@include common-auth
Auth required pam_google_authenticator.so

Save the file!

Now anytime you connect to your SSH terminal to this server, you’ll receive the 2FA push

[ivory-search 404 "The search form 3350 does not exist"]

Ubuntu Chrome Remote Desktop configuration

The Setup

Host: Ubuntu 18.04 “Bionic Beaver” release
Software: Google Chrome

I thought this was weird: I couldn’t actually download the Chrome browser. Couldn’t do it from firefox (the Ubuntu default), or chromium (the open-source O.G Chrome package). I thought that was sort of weird. Like Ubuntu linux didn’t support it or something. This means it’s simply not available in the Ubuntu software repository.

There are lots of guides of “how to install chrome” onto Ubuntu. I’ve compiled that here, as well as how to install and configure Chrome Remote Desktop.

  1. Install Google Chrome From SSH shell:
wget https://dl.google.com/linux/direct/google-chrome-stable_current_amd64.deb
  1. Once installed, own the CHROME browser directly to https://remotedesktop.google.com. This will add the Chrome Remote Desktop Extension directly to Chrome for you.
  2. Install the Extension
  3. When asked, choose a PIN for your desktop

This is the part of the blog where you think everything works. Not in this case. I kept getting this error:

I thought, maybe it’s because I didn’t add myself to the chrome remote desktop users group.

$ sudo usermod -a -G chrome-remote-desktop my_user_name

At this point, I decided to reboot for good measure.

After reboot, the Chrome Remote desktop was now in the applications

Although I still couldn’t connect from another host, still times out. Kept giving me errors that the startdaemon wasn’t starting properly.

With some help from monkey patching, I eventually got it working. Here’s the steps broken down:

  1. Stop Chrome Remote Desktop
$ /opt/google/chrome-remote-desktop/chrome-remote-desktop --stop
  1. Backup the original configuration
$ sudo cp /opt/google/chrome-remote-desktop/chrome-remote-desktop /opt/google/chrome-remote-desktop/chrome-remote-desktop.orig
  1. Edit the config file with nano (or whatever editor you prefer)
$ nano /opt/google/chrome-remote-desktop/chrome-remote-desktop
  1. Find DEFAULT_SIZES and amend to the remote desktop resolution. For Example:
DEFAULT_SIZES = "1920x1080"

In my case, I set it to “1920×1200,3840×2400” since the desktop had dual-monitors.

Set the X display number to the current display number (obtain it with echo $DISPLAY from any terminal). On Ubuntu 17.10 and lower, this is usually 0, and on Ubuntu 18.04, this is usually 1:

FIRST_X_DISPLAY_NUMBER = 1

Change it to “20”.

FIRST_X_DISPLAY_NUMBER = 20.

In my case, it happened to be 1.

Comment out sections that look for additional displays:

#while os.path.exists(X_LOCK_FILE_TEMPLATE % display):
<p><code># display += 1

Reuse the existing X session instead of launching a new one. Alter launch_session() by commenting out launch_x_server() and launch_x_session() and instead setting the display environment variable, so that the function definition ultimately looks like the following:

def launch_session(self, x_args):
self._init_child_env()
self._setup_pulseaudio()
self._setup_gnubby()
#self._launch_x_server(x_args)
#self._launch_x_session()
display = self.get_unused_display_number()
self.child_env[“DISPLAY”] = “:%d” % display

Save and exit the editor. Start Chrome Remote Desktop:

Sudo /opt/google/chrome-remote-desktop/chrome-remote-desktop --start

On a VM, this seems to fail. BUT on a physical box, i’m connected to it even as I write this without any issues.

Just have to get used to picking what session you want, Xsession, and I think the other was was regular ‘ubuntu’ session or something. Has to do with the different environments, one environment is strictly for when you’re sitting physically in front of the computer, the other is the remote session stuff over things like VNC.

Remoting in from external shows this on first boot up:

Once you select the session, that’s the same session you connect in with every time.

I’ve been using the 2nd option – “Ubuntu”

Breakdown of each option:

(default) – launch the default Xsession. This looks the same as “ubuntu” session. All the windows look the same, and the same settings seem to apply.

Ubuntu – I use this most often, looks like VNC ties to this instance too. Actually, I think the above selection (default) is just whatever you pick between ‘ubuntu’ session and ‘unity’ session.

Unity – looks like a completely different OS. The icons are different, the experience, everything. This appears to be a graphical interface of sorts, sort of like the flavors of KDE or GNOME.

There you have it, you now have a functioning Chrome Remote Desktop to your Ubuntu Box.

[ivory-search 404 "The search form 3350 does not exist"]


Oracle VirtualBox – Configure Guest-VM network to communicate with Host network

This is going to focus on configuring an Oracle Virtualbox VM to do a few things:
-make it so the host, and local host network can see, ping, remote and use fileshares to the Oracle Box guest VM
-Enable the Oracle box VM to still use it’s own built in DHCP (in case you have your own domain)

*I take no liabilities in configuring any of this, I had to figure this all out with trial and error!

The Setup

Host: Ubuntu 18.04 “Bionic Beaver” release
Software: Oracle VirtualBox (version 5.2.42-dfsg-0-ubuntu 1.18.04.1)
VM: Microsoft Server 2016 Domain Controller

For the purpose of this entry, I’m skipping over the creation of a VM, domain configuration and DHCP. All that’s configured within the Guest-VM Operating System. I won’t go into that, but what I will provide is a problem, and solution.

Problem
How can we get a already existing VM running MS domain services, to use it’s already pre-configured DHCP Scope, and yet allow it to talk with the rest of the host network?

Solution (short explanation):
Create a second network adapter in ‘bridged mode’, keep the primary network adapter in ‘NAT’ mode. Configure firewall rules on the Guest-OS to allow access.

Solution (long, and drawn out):
To preface this problem, I had a pre-existing domain controller with it’s own DHCP server. DHCP itself was handing out a 10.0.150.1/24 series of IP’s.

My VM Host however is on my home network, we’ll say that’s a 10.0.0.1/24 network. So how do we configure our VM to have access to our home resources?

First, turn off your VM.

1.Create a second Network adapter! From VirtualBox Manager goto Settings…

Orade VM Virtu•IBox M •na%r 
New Settings 
DC01 
Running 
Show 
>ettings...<br />
Clone.<br />
denove„<br />
Show<br />
Eause<br />
Machine Tools<br />
Global Tools<br />
Ctrl•S<br />
ctrl-o<br />
lists all virtual machines and virtual<br />
mputer.<br />
represents a set Of tools Which<br />
n be opened) for the currently<br />
Of currently available tools check the<br />
right side Of the main tool bar<br />
indow. This list Will be extended With

2.Goto Network.

For this VM, I put in a NAT network. There’s dozens of different ways to do this, but for this example, I created a NAT with a specific scope to isolate my domain for testing purposes. Here’s the Oracle VirtualBox documentation.

DOI settings 
Network 
Adapter 1 Adapter 2 
@ gnable Network 
(2 
General 
System 
Dtsplay 
Storage 
Audio 
Network 
Serial Ports 
Shared Folders 
user Interface 
Attached to: 
Name: 
v Advanced 
Promiscuous Mode: 
MAC Address: 
NAT Network 
VNATOI 100150.0/24 
Deny 
@ Cable Connected 
Port rorwaldirg

3.Create a New Network Adapter. Configure as ‘Bridged Adapter‘. In layman’s terms, a Bridged Adapter just means it’s using the physical connection from your host, and the VM is filtering data from the host.

General 
System 
Dtsplay 
Storage 
Audio 
Netvvork 
Serial Ports 
(2 
Shared Folders 
user Interface 
DOI settings 
Network 
Adapter 1 Adapter 
@ gnable Network 
Attached to: 
Name: 
v Advanced 
Promiscuous Mode: 
Address. 
Bridged Adapter 
enp0s25 
MT Oes«oø 
Deny 
@ Cable Connected 
Port rorwaldirg

4.From the Guest-VM, configure the networking to the same as the Host. You will need a static address from your DHCP – likely your home router or otherwise.

Internet Protocol Version 4 (TCP/IPv4) Properties 
Guest VM properties 
You can get [P settngs assigned automatcally if pur neb,Nork supguyrts 
this capability. Otherwise, you need to ask your neb,Nork administrator 
for the appropriate [P settngs. 
C) Obtain an [P address automabcally Example IP config 
• use the following [P address: 
[P addr ass: 
Subnet mask: 
Default gateway: 
101 
255 
255 
255 
Obtain DNS server address automatcally 
• use the following DNS server addresses: 
Preferred DNS server: 
Alternate DNS server: 
[3 Validate settings upon exit

5.Configure the Guest-VM firewall rules to allow traffic from that specific subnet.

  • Goto Firewall settings (depending on your flavor of VM, this is a Windows VM so your mileage may differ), advanced settings -> Inbound rules.
  • Scope (local IP addresses): the IP of your Guest-VM
  • Scope (remote IP addresses): the IP, or range of your management workstations on your Host subnet

allow all 10.0.0.1/24 traffic Properties 
Programs and Services 
Remote Computers 
Protocols and Ports Scope Advanced local Principals Remote users 
Local IP address 
C) Any IP address 
VM-Guest Sample Rules 
@ These I P addresses 
1000101 
Ram ove 
Remote IP address 
@ Any IP address 
O These IP addresses

  • Protocols and Ports: I set mine to ANY. It’s up to you what you want to expose from your Guest-VM to your Host.

allow all 10.0.0.1/24 traffic Properties 
Programs and Services 
Remote Computers 
Protocols and Ports Scope Advanced local Principals Remote 
Protocols and ports 
Protocol type 
Protocol number 
local port 
Remote port 
VM-Guest Sample Rules 
Example 80. 443. 
Example 80. 443. 5000-5010 
Intemet Control Message Protocol 
(ICM P) settings 
Customize ..

Programs and Services: ALL. Again, it’s up to you what you want to expose.

allow all 10.0.0.1/24 traffic Properties 
Protocols and Ports Scope Advanced local Principals Remote Ll sem 
Programs and Services 
Remote Computers 
Guest-VM Sample Rules 
@ All meet the specified conditions 
C) This program 
Application P ackages 
Specify tha application packages to which 
this rule applies 
Specify the services to which this rule 
applies

6.Now Test the configuration from your Host or a management computer on the same Host subnet:

test-netconnection -ComputerName 10.0.0.101 -Port 3389 -InformationLevel Detailed


(you can use ping test too, but I like to see the specific port)

ComputerName 
. 10.0.0.101 
RemoteAddress 
. 10.0.0.101 
Remoteport 
. 3389 
. 10.0.0.101 
Matchi I es 
Networklsol ationcontext : 
Internet 
IsAdmi n 
False 
InterfaceAI as 
Sour ceAddress 
. 10.0.0.36 
NetRoute (NextHop) 
. o.o.o.o 
TcpTestSucceeded 
. True

Success! Connection to the RDP port 3389 works!

Now you can remote desktop to your VirtualBox Guest-VM from within your network. Also means you can continue deploying VM’s to that Virtual Domain Controller’s DHCP. Hope this helps the next person.

[ivory-search 404 "The search form 3350 does not exist"]

GPO enable VSS in Win 7

GPO VSS 1

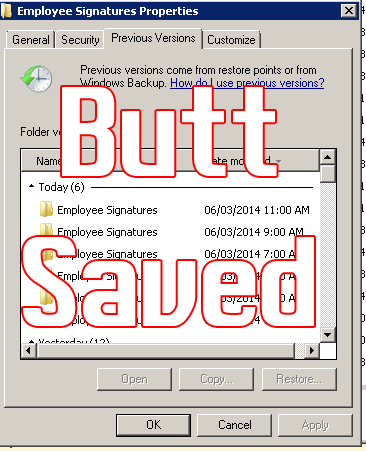
Volume Shadow copy has saved my butt on file, exchange, and SQL servers.  Typically, IT departments discourage previous versions on desktops mainly because it opens up issues with disk space and if it’s really worth saving or rescuing an MP3 or AVI.

Of course, if you have the space on your client machines to do it, you can enable VSS and grant users the chance to recover files right from their own desktop machines.

First, create a new GPO and give a give it an appropriate name.
1. Enable the Volume Shadow Copy Service (VSS):

Computer Configuration->Windows Settings->Security Settings->System Services->Volume Shadow Copy and set to Automatic.

GPO VSS 3

2. Now give your users the ability to restore the files on their local PC’s:
User Configuration->Policies->Administrative Templates->Windows Components->Windows Explorer->Previous Versions->

Prevent restoring previous versions from backups  – disabled
Prevent restoring local previous versions – disabled

See the Previous Versions setting

GPO add corporate picture to your AD logon account

Win 7 default picture

The default windows logon picture, while very stock is a bit boring. If you’re in the corporate environment where a more suitable logon picture is preferred, here are your steps to adding a default picture to all user’s profiles.

First, pick a picture and make your edits to make it EXACTLY 128 x 128 pixels (you can use the picture in this post as a guide). Make your edits accordingly and make sure to save it with a .BMP extension.

Create a new GPO, name it ‘Default Win7 logon picture’. Goto
User Configuration -> Preferences -> Windows Settings -> Files and create a new file

Create a new file in User Configuration-><figcaption id=Preferences->Windows Settings->Files->New” width=”280″ height=”390″> Create a new file in User Configuration->Preferences->Windows Settings->Files->New

Set Action to Replace
For Source file, place your newly created .BMP in the GPO unique ID path: (you can find it by going to the details tab of the newly created group policy)

note your unique ID here

The resulting path in the source file should look like:
\\domain\SYSVOL\domain\Policies\{really-long-unique-gpo-identifier}\User\Preferences\Files\User.BMP

For Destination File, enter:
C:\ProgramData\Microsoft\User Account Pictures\user.bmp
(to change the local windows 7 .BMP picture)

It should look like the above, be sure to be wary of the direction of your slashes "\"
It should look like the above, be sure to be wary of the direction of your slashes “\”

Lastly, apply the GPO to the proper User OU and make sure to do a Gpupdate /force.

*Alternatively, you can place your .BMP in a separate share on your network, ideally a DFS model will do as a general share requires full permissions.  The size of this particular .BMP was only 100KB, so Active Directory replication will be minimal.

Disable .exe’s from running inside any user %appdata% directory – GPO

The Cryptolocker virus out there in the wild and I’ve seen it happen on a few computers and it’s certainly not pretty. The details are sorrid, but in a nutshell what happens is a crytolocker virus gets onto your computer, locks all your pertinent files and demands a ransom amount so you can get your files back. Those who pay the ones delivering the virus will become more bold and will start demanding more money.

What can you do to protect your company?
Create some Group Policies to lock down likely places for Malware / Spyware / Grayware / Cryptodefense and other likely .exe programs from running:

– Open up Group Policy and create new GPO
– Title this policy Disable .exe from %appdata% and click OK
– Right click on this policy and select Edit
– Navigate to Computer Configuration –> Policies –> Windows Settings –> Security Settings –> Software Restriction Policies
– Right click on Software Restriction Policies and click on ‘New Software Restriction Policies’
– Right click on Additional Rules and click on ‘New Path rule’ and then enter the following
information and then click OK

Path: %localAppData%\*.exe
Security Level: Disallowed
Description: Don’t allow executables from AppData (Win 7)

Path: %localAppData%\*\*.exe
Security Level: Disallowed
Description: Don’t allow executables from AppData subfolders (Win 7)

Path: %localAppData%\Temp\*.zip\*.exe
Security Level: Disallowed
Description: Prevent unarchived executables in email attachments from running in the user space (Win 7)

Path: %localAppData%\Temp\7z*\*.exe
Security Level: Disallowed
Description: Prevent 7zipped executables in email attachments from running in the user space (Win 7)

Path: %localAppData%\Temp\Rar*\*.exe
Security Level: Disallowed
Description: Prevent Rar executables in email attachments from running in the user space (Win 7)

Path: %localAppData%\Temp\wz*\*.exe
Security Level: Disallowed
Description: Prevent Winzip executables in email attachments from running in the user space (Win 7)

The following paths are for Windows XP machines (if you still have them; I put these in just in case with the same disallow security settings)
%AppData%\*.exe
%AppData%*\*\*.exe

Create your new path rules as seen above

GPO Selections
Your final selections should look like the above. Make sure to apply the GPO to the proper OU once done.


*Update Feb 02, 2016*

I spent some time on a conference call with some Malwarebytes reps, I’ve been test driving a beta version that’s now available to the public.

Introducing Malwarebytes Anti-Ransomware

As I understand, the good folks at MalwareBytes will be conglomerating all their products: Anti-Malware, Anti-Ransomware, Anti-Malware, and Anti-Exploit into one nice big runtime. (date not yet announced).