

The preamble
Docker? Total enigma. I sidestepped it for years… until August 2023, when the guy hosting fatdex.net had to evacuate his Yukon office because of wildfires.
He eventually booted things back up, but my beloved WordPress site greeted the world with a glorious white screen. Odds are I tinkered with something and assumed he’d resurrect it. Spoiler: I bricked it. By November, he was back but couldn’t restore the site. He did hand me some old MySQL backups, so there’s hope.
Rather than spinning up WordPress on my local machine, I needed separation—something repeatable and resilient. Normally I’d jump straight to a VM; I’ve got the horsepower. But containers felt like a smarter route. I’d messed with Kubernetes and Docker before—deployed a container to our Azure cluster, poked around with configs—but never really paid much attention to the architecture.
This kicks off my dive into Docker Desktop.
Next up: all the technical steps and sources I used to revive WordPress.
Installing Docker for Windows and WSL Configuration
There’s plenty of blogs about enabling WSL (Windows Subsystem for Linux) in Windows. So the quick and dirty install is; enable WSL in windows features, reboot. Install a linux OS from the Microsoft Store.
Docker installation is straightforward; either download and configure docker desktop for Windows, or use winget to install the latest version.
With Docker Desktop and WSL; check your WSL bash terminal
$ wsl.exe -l -v
Output should show your running linux environments
┌──(user@Windows-workstation001)-[/usr/local/bin]
└─$ wsl.exe -l -v
NAME                   STATE           VERSION
* kali-linux           Running         1
docker-desktop         Running         2
Ubuntu-22.04           Running         2
Otherwise, check with powershell
PS C:> wsl.exe -l -v
  NAME                   STATE           VERSION
* docker-desktop         Running         2
  Ubuntu-22.04           Running         2
Docker Building WordPress From .yml File
From Bash, create a new folder, ideally in your \home\ directory.
user@Windows-workstation001:~$ mkdir wordpress_restore
cd wordpress_restore
I grabbed a .yaml file from this site that has myphpadmin, wordpress and mysql. I made some adjustments, particularly to the location of the db_data volume, external ports, and the values. Your mileage may vary.
version: '3'
services:
  db:
    image: 'mysql:5.7'
    volumes:
      - 'db_data:/var/lib/mysql'
    restart: always
    environment:
      MYSQL_ROOT_PASSWORD: password
      MYSQL_DATABASE: wordpress
      MYSQL_USER: wordpress
      MYSQL_PASSWORD: wordpress
    networks:
      - wpsite

  phpmyadmin:
    depends_on:
      - db
    image: phpmyadmin/phpmyadmin
    restart: always
    ports:
      - '8188:80'
    environment:
      PMA_HOST: db
      MYSQL_ROOT_PASSWORD: password
      UPLOAD_LIMIT: 400M
    networks:
      - wpsite

  wordpress:
    depends_on:
      - db
    image: 'wordpress:latest'
    ports:
      - '8181:80'
    restart: always
    volumes:
      - './:/var/www/html'
    environment:
      WORDPRESS_DB_HOST: 'db:3306'
      WORDPRESS_DB_USER: wordpress
      WORDPRESS_DB_PASSWORD: wordpress
    networks:
      - wpsite
networks:
  wpsite: null
volumes:
  db_data: null
Save this into the newly created folder in your bash session. Save as “compose.yml” with either nano or vi
user@Windows-workstation001:~/wordpress_restore$ ls
compose.yml
At this point, we can bring up a docker image of wordpress with phpmyadmin, mysql database, and a wordpress installation. To do this, from bash, issue
$docker-compose up -d
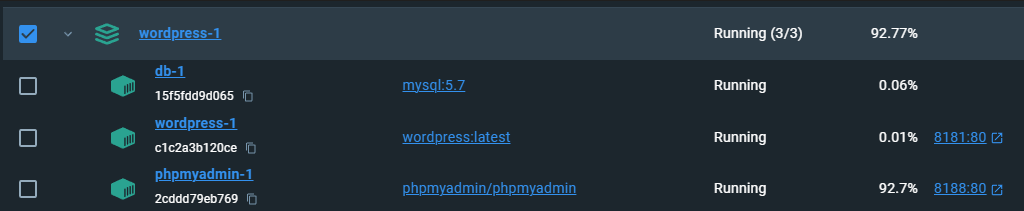
This pulls down the images, and you can see them generating in the docker desktop application.
You’ll notice in your docker desktop, 3 new containers: mysql, wordpress and phpmyadmin. Notice the URLS on the right-hand side showing the ports (8181:80 or 8188:80). Keep in mind that 8181 and 8188 are only exposed on your host side, whereas on the inside of the container it uses all port 80.
I suggest waiting about 5 minutes after deployment before visiting the respective URLs.
Docker WordPress initial setup
Let’s ensure the wordpress config is working with the wordpress link from docker desktop: This goes to http://localhost:8181\wp-admin/install.php
I suggest setting it up all the default settings to start. Or just doing the ‘install wordpress’ portion at the very least.
Once that wordpress is working, let’s go into phpmyadmin and restore our wordpress blog:
PHPmyadmin database restore procedure
I had a fairly large sql backup file from my web provider. However you obtain it, I suggest using your providers phpadmin and getting the .sql file. For this example, I named mine: fatdex_wordpress4.sql
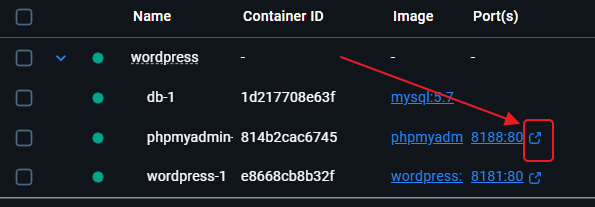
Phpmyadmin:
(in the docker desktop, you can just visit the link directly from containers-> phpmyadmin:8188:80). Username is from the .yml file (root/password)
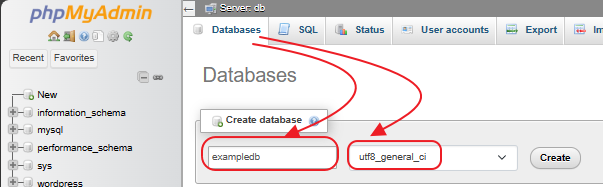
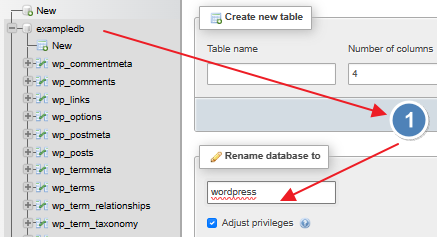
Create a new databse, doesn’t matter what you call it since you’ll be renaming it soon. For this, I’ll create it as ‘exampledb’
Once the database is created, goto ‘import’ and select the backup.sql file you created earlier. Mine is ‘fatdex_wordpress4.sql’
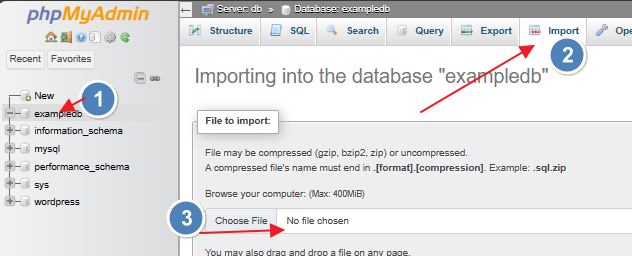
Hit import along the bottom:

Restore depends on the speed of your connection, and the processors in your SQL engine.

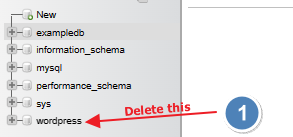
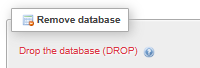
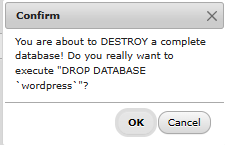
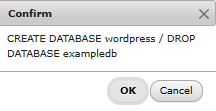
Now, we DELETE the existing ‘wordpress’ database – the one created during the docker compose.yml configuration
And RENAME your restored database to ‘wordpress’
WP-Config.php HTTP and local domain settings
Goto your wp-config.php (base folder of wordpress from the yml file) and add these lines anywhere:
/** Settings to keep this working on any domain name */
define('WP_HOME', 'http://' . $_SERVER['HTTP_HOST']);
define('WP_SITEURL', 'http://' . $_SERVER['HTTP_HOST']);
Adding these lines make sure that it always stays local to your machine. To force HTTP(80) instead of HTTPS(443), edit the below line to:
*old* $_SERVER['HTTPS'] = 'on';
*new* $_SERVER['HTTPS'] = 'off';
Now you can visit your site in regular HTTP mode via http://localhost:8181/wp-admin
.htaccess increase file size uploads
Since you’re moving files around a local computer, you likely don’t care about bandwidth from your local machine to docker. I suggest editing your .htaccess file to increase your local upload maximums and memory. The .htaccess file resides in the base wordpress files from your .yml config.
Add these lines to your .htaccess file with vi.
php_value upload_max_filesize 12M
php_value post_max_size 13M
php_value memory_limit 15M
Copy all your wp-content over
Once saved, we have to move all the pertinent files into the correct locations for the restore. This includes wp-content:
\plugins
\themes
\uploads
Keep in mind, you HAVE to do this from the location the wordpress was installed, it has all the timestamps and edits required.
visit your wordpress http (not https) link, (mine is :8181). And you should see your newly restored site.