The last firmware released for the DNS323 was back in 2013. That was quite a while ago, and it wasn’t great. It lacked SMB2, ssh out of the box, and no development of popular applications. I tried Alt-F on a spare DNS323 as a test to see if I could get rsync up and running.
This isn’t meant to be an expansive entry of the pro’s and con’s of this firmware. This is supposed to be a straight forward approach of configuring the DNS323 as a rsync target for backups compatible with synology dsm 6.3.
Let’s not kid ourselves, this device is pretty old. The last time it was sold any where was around 2007. As of this writing that was 14 years ago. The processor is 500MHz, it’s got 64MB of RAM, the max data transfer possible is 10MBps. I do NOT recommend putting any sort of production or super-important data onto this. I’m using this because I love to tinker, and I have an over-abundance of spare harddrives. So please, as interesting as this entry is, if you want something with performance look at a modern NAS and drives with warranty and up to date specifications!
Moving along…
The coles notes version of alt-f installation:
- Download the latest alt-f firmware
- Log into your DNS323 and apply the alt-f firmware
*I take no responsibility past this point. These instructions are recommendations, and should not be taken verbatim. This is not an official support channel. Take all the necessary precautions to backup your data beforehand.
3. Create a login password, this will also act as your ‘root’ password too.
4. Format your disks. EXT2/EXT3/EXT4 and few others are available.
It’s your choice to stick with a RAID 1/0 or JBOD. I’m using older disks and this is strictly backup for my purposes.
Create the Rsync User
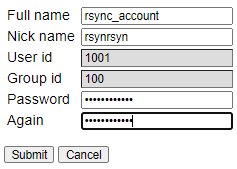
Let’s create an rsync user first.
Setup -> Users
Note the full name is the “windows name”, where the nic name is the “linux login” name. Take particular note of the linux name, this is what the synology needs to initiate a backup.
Create a folder and Share
Now we’ll need to create a share to mount the backup.
Setup -> Folders
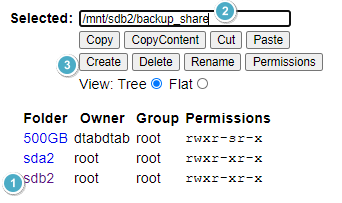
Note the mounted drives. I configured mine independently.
- Sda2 – 500GB drive
- Sdb2 – 1000GB drive
I gave mine a share name of “backup_share”. Then hit ‘create’.
Once created, change permissions accordingly.
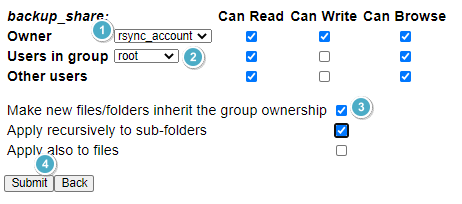
With the drive folder and permissions set, now configure the share.
Services -> Network -> smb -> Configure

Create a share based on the folder you created ealier

As a test, make sure you can browse the share from windows explorer
Ie. (\\DNS323\backup_share)
Use the username and password you created above. Make sure you can create files and folders. Notice you can enable SMB1, and SMB2 from this panel. I tried to disable SMB1, but that just made the share disappear from my Windows 10 explorer. Could be a bug they’re working out.
Side Quest – SAMBA module
There’s also an ‘Advanced’ button in Samba Setup. Use the same root password to see the contents.

This panel is a bit more graphical in presentation. And gives a good representation with the ‘view’ icon of the current shares published. Spend a little time looking around, there could be some tweaks you could find useful in this section.

Rsync Service Setup
Let’s setup this DNS as the rsync target.
Services -> Network -> inetdS

Hit ‘configure’ on the rsync service

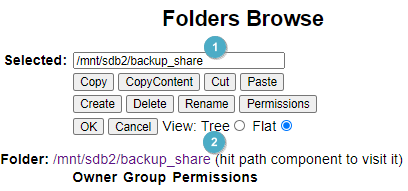
Configure a new folder based on the path and user you created above.

- It’s easier to use the built-in browser to get to your folder. Otherwise if you know it already you can enter it here. Remember, this is linux, all the directory slashes are ‘/’
- The module name is the viewable share name in Windows
- Add your comments as necessary
- Set permissions for the rsync account created above
Now, let’s validate the folder created above (ie. /mnt/sdb2/backup_share) exists in the rsync configuration folder. We’ll use an SSH client for this. Just regular connection with root@DNS323 works. Goto \etc and more on rsyncd.conf.
The top line should give the location of rsyncd.secrets – a password encrypted file that only rsync users should have access to.
And the bottom portion should provide the recently created directory with permissions for your rsync user.
PS C:\> ssh root@dns323-2
root@dns323-2's password:
[root@DNS323-2]# cd etc
[root@DNS323-2]# more rsyncd.conf
#Sample contents
secrets file = /etc/rsyncd.secrets
use chroot = yes
read only = yes
dont compress = *
list = yes
...
…
[rsynrsyn]
        comment = rsync backup directory
        path = /mnt/sdb2/backup_share
        auth users = rsynrsyn
        uid = rsynrsyn
        gid = users
        read only = no
You can tweak this to do things like host allow within a certain subnet. For this, I’m just focusing on getting rsync running.
While you’re in here, have a look at your rsyncd.secrets file. Ideally, this should only give one rsync user with password. Something like
rsynryn:password
DSM – Setup HyperBackup
Now we can create a backup job and target the DNS323 (with alt-f firmware). Create a new backup job, choose rsync as the file server type.

Settings should be similar to below.
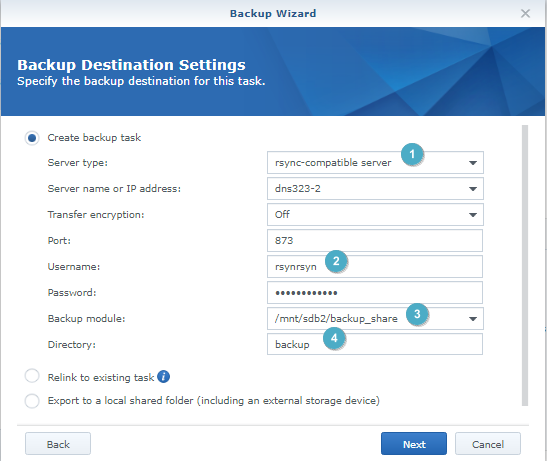
For the backup settings, configure the Server type as ‘rsync-compatible server’, enter in the pertinent details of your DNS323. It should look similar to the screenshot below. For port, just keep the default 873. The Backup module, make sure to use the exact same “Path” from the rsyncd.conf file.
ie. path = /mnt/sdb2/Backup_share
Backup module = /mnt/sdb2/Backup_share
Directory = Backup_directory
And this creates a new directory of whatever name you want.
After this you should be able to select items to backup. Set your items, schedule them and make use of the rotational backups (very handy).
Be aware of the speeds, even if you have SMBv2 enabled, the backup jobs are still pretty slow over rsync. Still hovers around 1.2MB/s. So time your backups accordingly, and be aware that DSM Hyperbackup cannot do simultaneous backups.
-Dexter

6 thoughts on “How to: Configure a DNS-323 (ALT-F firmware) as an Rsync Target”
James Pike
Very good write up. When I get new drives for my NAS’s, I use rsync to move my files to the new drives.
Just wanted to add to this, as I’m an avid Alt-F user on all my NAS’s. I have a DNS-323, and 3 DNS-325’s all running Alt-F.
Another great benefit from running Alt-F, is hard drive increase. I’m currently running 2 10TB hard drives in each NAS. This would not be possible with the original firmware. I’ve been talking with João Cardoso (The creator of Alt-F) and he thinks 10TB is the max. I’m hoping to get larger drives, and test that theory.
Alt-F really gives new life to these older NAS units. (ONLY for DLINK DNS-320/320L/321/323/325/327L and DNR-322L.)
https://sites.google.com/site/altfirmware/ (in case people are looking for it.)
Antony Pelekanos
This is just what I need but I can’t see the first few pictures – they look like dead links and all I get is some “machine-generated text”. Is there a way to access them? My almost-zero linux experience does not allow me to proceed without them 😦
Dexter
Visit my fatdex.ca site, this .net site is going to be decommissioned soon
Antony Pelekanos
This is just what I need but I can’t see the first few pictures – they look like dead links and all I get is some “machine-generated text”. Is there a way to access them? My almost-zero linux experience does not allow me to proceed without them 😦
Dexter
Fixed up the images – have a look now.
Antony Pelekanos
That’s great – thank you so much!